

Kumihimo Resources
Welcome to the BraidersHand Kumihimo Resources page. Whether you are just beginning your braiding journey or have years of experience, this page brings together learning resources, practical tips, reference information, and links to organizations that support the art of Kumihimo.
BraidersHand also offers a large selection of English-language books on Kumihimo, including titles covering the Marudai, Takadai, Ayatakedai, Karakumidai, Disk and Plate braiding, Andean braiding, and related fiber arts. We invite you to browse our Books section for additional learning resources.
On This Page
- Kumihimo Terms
- Getting Started
- Working with Thread
- Keeping Braiding Notes
- Counterweight
- Equipment Tips
- Sageo Resources
- Braiding Organizations and Groups
Kumihimo Terms
Kumihimo (coo-me-he-mo) — kumi = to braid; himo = string or cord. Braided cords.
Karakumidai (car-uh-coo-me-dye) — Kara = Chinese + kumi = to braid + dai = stand. Chinese braiding stand.
Takadai (tah-cuh-dye) — Taka = high; dai = stand. High braiding stand.
Marudai (mah-roo-dye) — Maru = round; dai = stand. Round braiding stand.
Ayatakedai (aye-yuh-tah-kay-dye) — Ayatake = wooden; dai = stand. Wooden braiding stand.
Tama (Tah-mah) — Lead-weighted wooden spools used to tension the threads during braiding. Commonly called bobbins.
Getting Started
Michael Hattori has produced an outstanding series of instructional videos covering traditional Kumihimo techniques. They are highly recommended for both beginning and experienced braiders.
- Ito Sabaki — Handling traditional Kumihimo threads.
- How to tie threads to the tama — A technique suitable for all thread types.
- Basic Marudai Technique — Proper Tama movement and thread handling.
- Kamkuri-Guri Twist — Demonstrates twisting threads for the Ayatakedai and other structures. Occasionally you may find a marudai pattern that calls for twisted threads. Familiarize yourself with Michael's demonstration on twisting threads for the ayatakedai as it is the most efficient.
- Takadai Demonstration — Shows proper thread tension and movement while braiding.
Japanese Karakumidai Demonstration on the Karakumidai (starts at 6:05). This demonstration begins at approximately 6:05. Slowing the video playback makes it easier to study how the threads are handled.
Claudia Wollny has produced excellent books and instructional videos covering a variety of Kumihimo techniques.
Rosalie Neilson offers classes and a helpful essay, The Silk Standard, which is well worth reading.
Craft Design Online offers design software and applications for planning Kumihimo braids.
Working with Thread
Cutting Kumihimo Threads in Half
If you choose to cut the threads in half after they have been smoothed, tie a knot in both ends before cutting. This will help prevent the threads from slipping apart.
Dividing a Bundle into Smaller Sections
If you wish to divide a section in half, first estimate the center of the bundle, then follow these suggestions.
- Work in a well-lit area.
- Keep pets out of the room and avoid wearing shoes or clothing that could catch the threads.
- Smooth the threads before separating them.
- Pull the half-section sideways from the remaining threads, much as you would separate embroidery floss.
- Avoid pulling along the length of the bundle, as this greatly increases the chance of tangles.
- If the threads begin to tangle, stop immediately. Gently smooth them back toward the end of the bundle and try again.
- If necessary, separate one thread at a time. It takes a little longer but produces the best results.
Once the bundle has been divided, count the threads to be sure each half contains approximately 21 threads. A standard section of Kumihimo silk contains about 42 threads, although the exact number may vary slightly from bundle to bundle.
Planning a Braid
Plan for more braid that you think you will need. Braids typically take-up half of the length of the threads (called the warp) that you start with. Thicker threads and yarn will take up more and finer threads less; threads with beads and threads that are idle part of the time will also take-up more.
One rope of silk consists of four sections of approximately 42 threads each (about 168 threads total). If the rope is cut in half to produce eight sections, there is enough material to braid a necklace approximately 25 inches (64 cm) long.
Keeping Braiding Notes
Sampling is a good habit, and so is keeping notes—even if you don't expect to make the same braid again. You will probably use the thread, colors, or structure in a future project, and good notes will save you from starting over each time.
- Date
- Type of Braid and Purpose
- Number and Weight of Tama
- Counterweight
- Thread Type and Source
- Original Warp Length and Finished Braid Length
- Number of Threads per Tama
- Braid Movements (drawings or references to published patterns)
- Color Placement
- General Notes (purpose, observations, and finishing method)
Counterweight
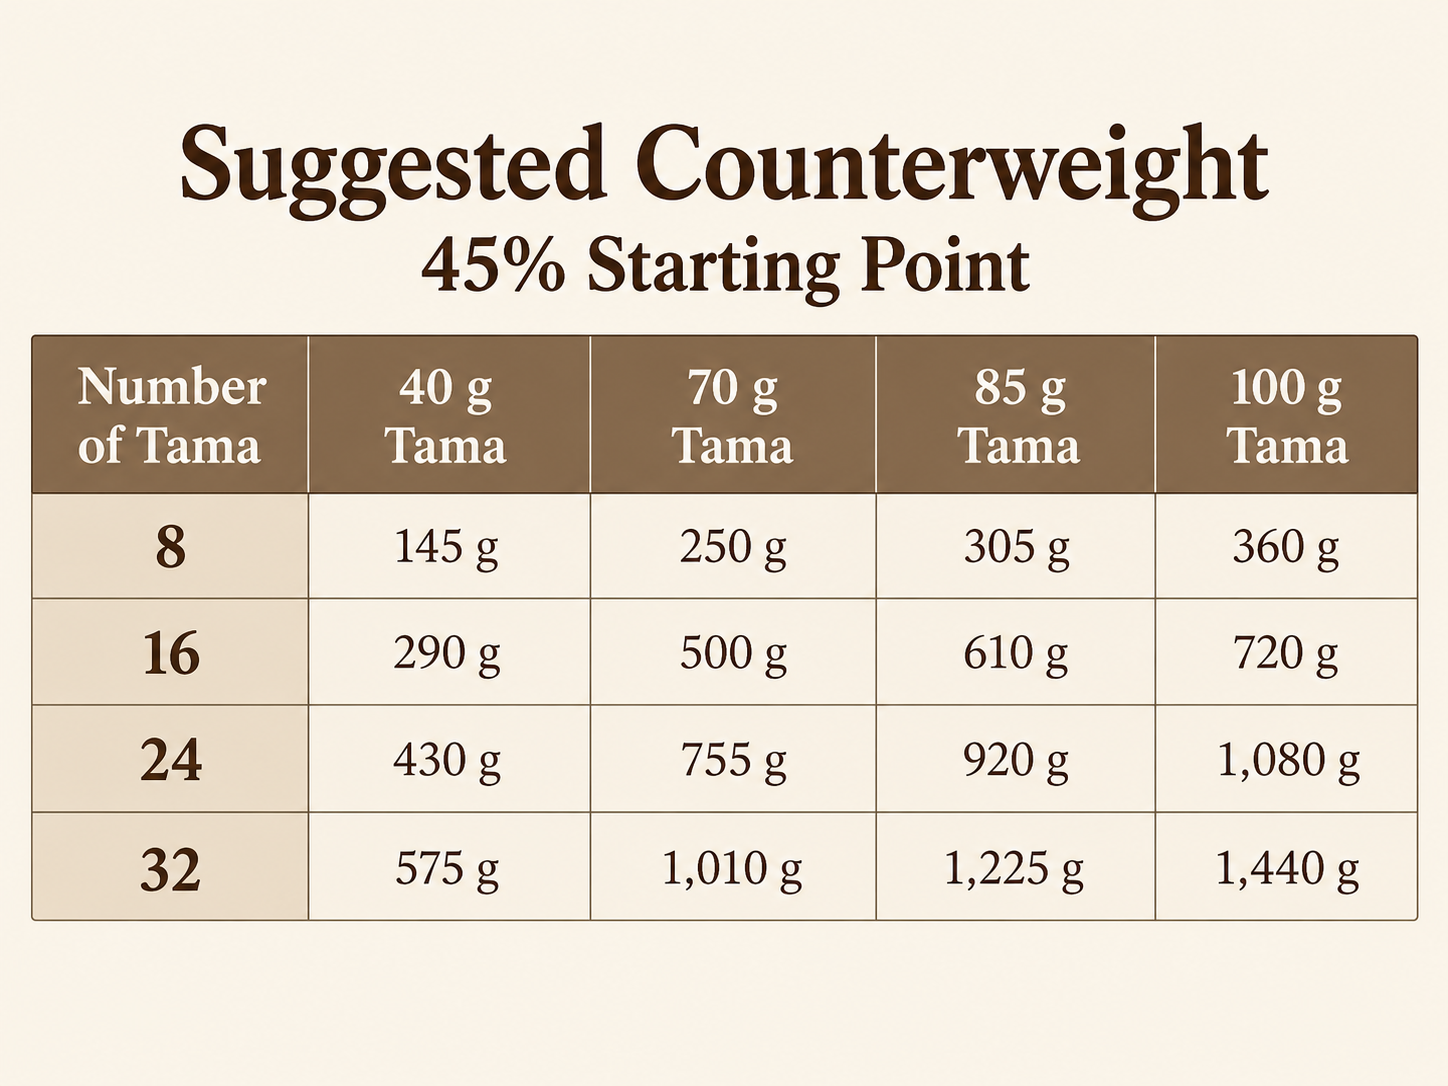
Counterweight: As a general starting point, use a counterweight equal to approximately 40–50% of the combined weight of all the tama. About 45% is a good standard starting point. The amount may be adjusted depending on the braid structure, fiber, and desired braid density.
See below for tips on adjusting the counterweight and understanding how the relationship between tama weight and counterweight affects your braid.
----------
The following observations on counterweight and Tama weight were written by Janis Saunders, longtime co-owner of BraidersHand. Her experience and practical insights continue to benefit braiders, and we are pleased to share them here.
Adjusting Counterweight
To understand how the counterweight affects the braid prepare a warp to make a 20 inch braid in your favorite structure. First, use as much counterweight (see note keeping suggestions below) as you can and still keep everything balanced. Braid at least 10 inches and you will see that you have a very supple braid with long floats.
Now take out as much counterweight as you can and braid another 10 inches. This braid will be stiff with short floats. The point of this exercise is to see how much you can influence your braid with the relationship of the counter weight to the weight of the tama.
Fishing weights make good counterweight. Rodrick Owen suggests having the following weights on hand: 3 - 8oz; 3 - 4oz; 2 - 2oz; 3 - 1oz.
Remember that your braids aren't finished until they are steamed over a tea kettle. Use a chopstick to hold the braid over the steam so that you don't burn your hands.
Counterweight and Tama Weight
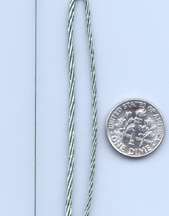
This photo is of tiny two kongoh (spiral braid) braids both made with sixteen 100 gram tama. The line on the left is actually one end of kumihimo silk, the braid next to it is made using two ends of silk per tama and the thinner braid on the right has one end of silk per tama. In this case I used very little counterweight as I wanted a stiff braid and that is exactly what I got.
I was quite surprised to see that the 100 gram tama would not be too heavy for one end of kumihimo silk, but then silk is very strong. This sample further illustrates the relationship of counter weight to tama weight; I could braid a large number of braids of different degrees of stiffness and size with the 100 gram tama.
The relationship of the counterweight and tama weight
Marudai braids are traditionally stiff, by adjusting the counter weight they can be made more pliable. After you feel comfortable with one of the braids you like to make, I suggest this exercise.
- Prepare to braid three braids about 10" long, using the same structure.
- Braid the first with the suggested counterweight which puts the point of braiding just a little below the top lip of the hole.
- For the second braid, take out as much counterweight as you can and still be able to braid. The point of braiding will float a little bit above the lip of the hole.
- For the third sample put in as much counterweight as you can and still be able to braid, the point of braiding will be well below the top lip, maybe even a bit below the bottom lip.
- You will see that the sample with the least amount of counterweight is dense, with more, shorter floats per inch, while the sample with the heaviest counterweight will be less dense, with fewer, longer floats per inch because the braid is being pulled down faster. The sample with the suggested counterweight is the "control" braid.
- These samples make great reference for future braids.
Equipment Tips
Counterweight Bag Drawstring
Perle cotton, commonly used for crochet, and mercerized cotton, familiar to many weavers, both make excellent drawstrings for counterweight bags. A round cotton braid grips the bag securely and wears well over time.
An easy way to estimate the number of ends needed for a braid is to double the thread back on itself repeatedly until you have enough ends to twist firmly into a cord. The diameter of the twisted cord will closely approximate the finished braid. Count the number of ends and divide by the number of Tama you intend to use.
Example: If you plan to braid with 16 Tama and your sample contains 32 ends, place 2 ends on each Tama. If you are using 8 Tama, place 4 ends on each.
As a practice project, prepare a warp for 8 or 16 Tama at least 34 inches (83 cm) long. The finished braid will be approximately 17 inches (43 cm) long. Use enough ends to produce a braid about ⅛–3⁄16 inch (3–5 mm) in diameter. Begin with a counterweight equal to approximately 50% of the total Tama weight and braid a supple spiral (Kongoh Gumi).
Tama Slipping?
If the leaders on your Tama are slipping, use sandpaper to rough up only the area where the leader is attached to the Tama.
Sageo Tips from Makiko Tada
The following recommendations for Sageo braids were kindly provided by Makiko Tada.
-
You can use any braids for Sageo.
-
Most people like to use flat braids.
-
Here are several braids that are good for Sageo and that can be made on the marudai. They can be found in Makiko's book, Comprehensive Treatise of Braids I: Maru-dai Braids.
-
For beginners, Hiranami-Yatsu (#20) or Yatsu-se (#12) (240 g bobbin x 8)
-
For experienced braiders, Hira-Kara (#27) (100 g bobbin x 12 or 16) or Rikyu (#33) (100 g bobbin x 12)
-
For advanced braiders, Sasanami (#101) (100 g bobbin x 24) or Kara kumi (#104) (100 g bobbin x 32)
-
Makiko has kindly provided instructions for a braid called Shigeuchi, which makes an excellent Sageo. The top instructions are for the marudai and the bottom instructions are for the takadai. For many photos of Sageo, click here.
Braiding Organizations and Communities
These organizations provide excellent opportunities to learn, meet other braiders, and continue developing your skills.
American Kumihimo Society
Membership includes an annual journal and a yearly conference.
The Braid Society
Publishes an excellent journal devoted to narrow textiles and sponsors an international conference approximately every two years.
Kumihimo Braiders International (KBI)
Offers a wealth of knowledge through its experienced membership and extensive member files.
Facebook Communities
There are also many active Kumihimo and braiding groups on Facebook where members share projects, answer questions, and encourage one another.